A prompt box should not be a blank wall
Most AI tools give you an empty text box and ask you to remember what the assistant can do. Can it browse? Can it schedule work? Can it remember project facts? Can it build a chart? Can it call an MCP server? The answer is often yes, but the interface hides the capabilities behind tribal knowledge and keyboard folklore.
Onevium takes the opposite approach. Type @ in the composer and the available work surfaces appear as a simple tool menu: Widget, Browser, Schedule, Channel, Skill, Memory, Agent, MCP, Plugin, and Files. The point is not decoration. The point is to make every capability discoverable at the exact moment you are writing the task.
That matters because real work is rarely just one model response. A product manager wants a chart and a launch note. A developer wants a browser smoke test and a patch. A founder wants a scheduled competitor scan delivered to a channel every morning. The @ menu turns those into selectable building blocks instead of separate apps.
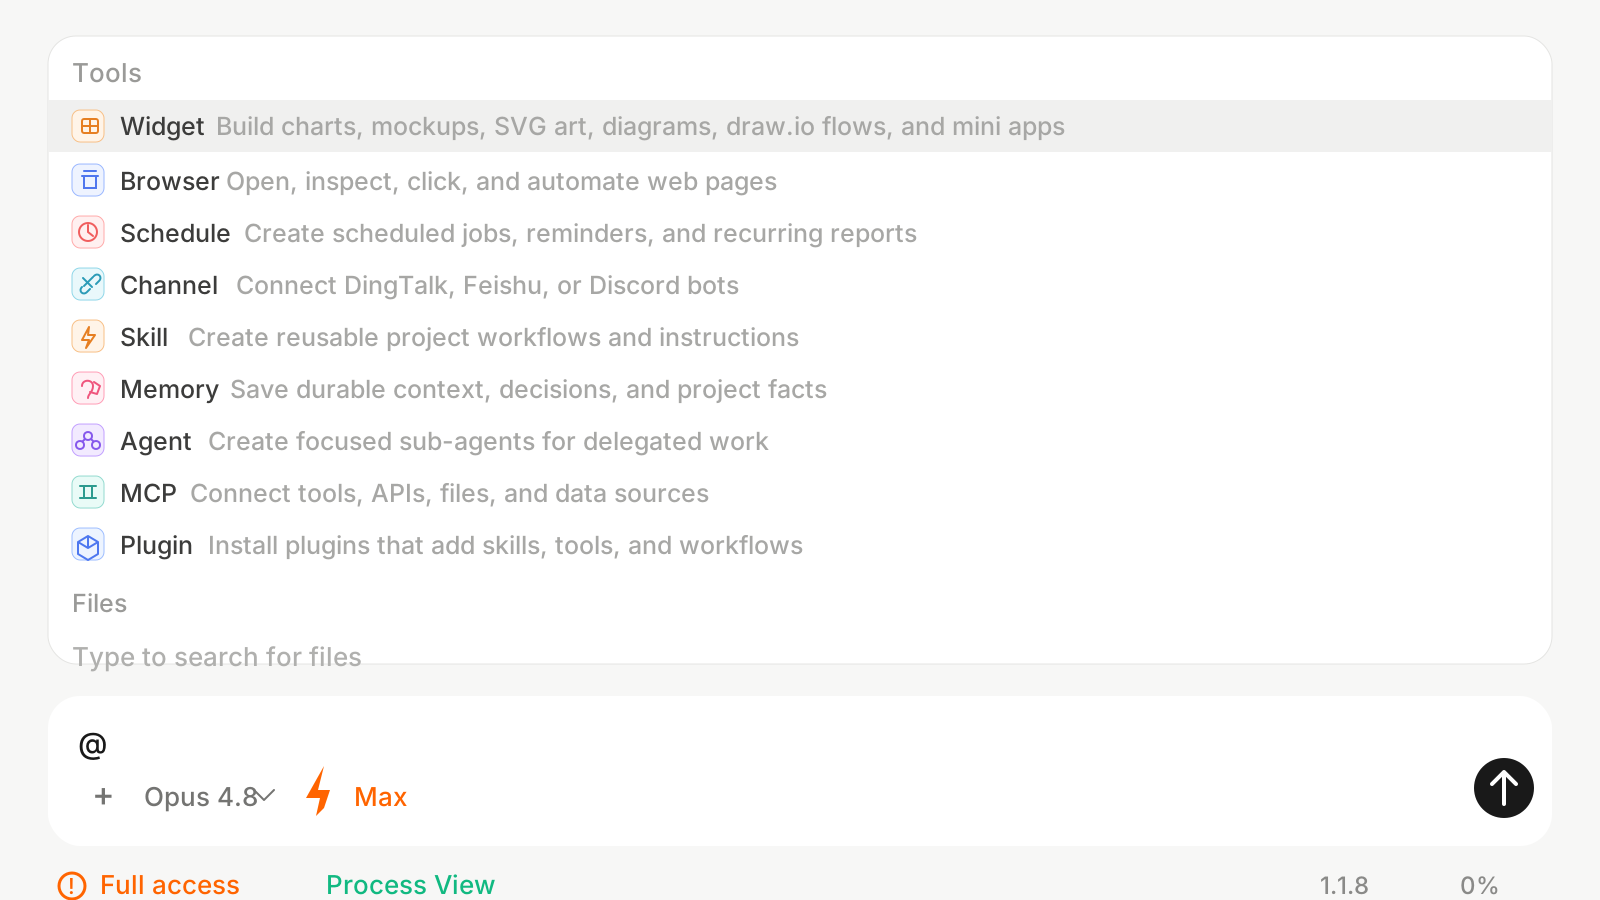
What each tool means in plain English
The menu is intentionally written in user language, not implementation language. Each row answers a question a normal user has while writing a prompt: what kind of work am I asking Onevium to do?
- Widget — build charts, mockups, SVG art, diagrams, draw.io-style flows, and mini apps. Use it when the answer should be visible, inspectable, or reusable.
- Browser — open, inspect, click, and automate web pages. Use it for QA, competitive research, dashboards, forms, docs, and anything that only exists in a real browser session.
- Schedule — create scheduled jobs, reminders, recurring checks, and reports. Use it when you want the work to happen later or repeat without you reopening the thread.
- Channel — connect DingTalk, Feishu, or Discord bots. Use it when the result belongs in the team's conversation instead of buried in your local chat history.
- Skill — create reusable project workflows and instructions. Use it when you are tired of re-explaining the same process every time.
- Memory — save durable context, decisions, preferences, and project facts. Use it when the assistant should carry learning across sessions.
- Agent — create focused sub-agents for delegated work. Use it when one long prompt should split into focused specialists.
- MCP — connect tools, APIs, files, and data sources. Use it when Onevium needs capabilities beyond the built-in desktop surface.
- Plugin — install bundles that add skills, tools, and workflows. Use it when you want a larger capability area to appear without hand-building everything yourself.
- Files — search and attach project files. Use it when the right context already exists in your repo and the assistant needs to read it before acting.
Why the menu sits inside the composer
A separate tools page would be easier to build, but worse to use. The moment you need a tool is the moment you are forming the request. Keeping the menu inside the composer lets you move from intent to execution without breaking flow.
That also changes how users learn the product. You do not need to read a manual before asking for a workflow. You type @, scan the verbs, and pick the shape of the work. The UI teaches the capability surface while you are already doing the job.
For teams, this reduces the hidden-expert problem. A new teammate can discover scheduled runs, channel bots, memory, browser automation, and MCP connections from the same place an experienced user invokes them. The power is there, but it is not hidden behind configuration screens.
A normal day with the @ menu
Imagine you are preparing a release. You start with @Files to attach the changelog and release notes. You ask Onevium to draft the public announcement. Then you use @Widget to turn the feature list into a comparison chart. You use @Browser to open the staging site and click through the onboarding flow. You use @Schedule to create a reminder that checks the download links tomorrow morning. Finally, you use @Channel to post the final summary to the launch room.
Nothing about that workflow is science fiction. It is the same set of actions people already do manually across a browser, notes app, design tool, calendar, and team chat. The difference is that Onevium keeps the work in one visible surface and lets the model operate across the right tools with your approval mode.
The @ menu is the handoff point between thinking and doing. You still write the instruction in natural language, but the instruction is no longer trapped in a chat-only world.
Why it matters for trust
Autonomous tools are only useful when users can see what kind of action is about to happen. A hidden tool call feels surprising. A visible @ selection feels intentional. When you choose Browser, Schedule, Channel, or MCP, you are giving the task a shape before the model starts acting.
That is why the menu pairs naturally with Onevium's permission mode selector. You can keep Full access for trusted local work, switch to stricter approvals for sensitive tasks, or use a more deliberate setup when the task will touch external systems. The model gets capability; the user keeps control.
This is the product philosophy behind Onevium: give AI real tools, make those tools visible, and keep the user close enough to understand what is happening.